Wednesday, October 28, 2009

Holiday Card Giveaway

My cute, crafty friend is having a Giveaway for Holiday cards. She creates the card for you with the desired text and photo and you take it anywhere you want to print them off. Easy-Peasy-Lemon-Squeezy! Glimpse is her website, go enter and good luck!!!

Tuesday, October 27, 2009

Cutest Baby Stuff

My cute friend does custom orders for baby clothing and accessories and they are SOSO cute! She's so talented and fashionable. Just wanted to give her a little free advertisement and recommendation. She also does customer orders so if you want Halloween booties with a matching bib or Christmas booties...your wish is her command:) Her Etsy shop is The Paisley Peach Here are some of my favorites:

Love this print!
It also comes with a matching headband and reversible bib.
Love the bib too.

This is reversible and has a cute print on the other side. It's washable too.

So dang cute!


Wednesday, October 21, 2009

Medicine Cabinet

I bought this medicine cabinet thing at Rod Works a few years ago for $10. I loved it at the time and had the intention of doing a shadow-box thing with it but it never came into fruition.

The shelves are really too short to put anything in so it's just hung on my bathroom wall.
I love the distressed and antiqued look.

I also loved the color so I didn't want to paint it. I decided to take the door off. Because it was "authentically antiqued" (a.k.a rusted:) I had to kind of man-handle the screws to get them out because some of the heads and the hinges were stripped and rusted.

I moved the D-rings from the top to the side and tied a ribbon through them. I liked the raw wood spots where the hinges used to be. It makes it more authentic to me so I just left 'em. I added some paper and mod podge to the back. I want to add some knobs for jewelry or some knick-knacks.
Now, any ideas what to do with the unused door?


Monday, October 12, 2009

Name blocks

I got these blocks for our wedding. I like the "Believe" but it's kinda "blah" and it just so happens that our last name as the same number of letters as the current blocks. WAHOO!

In keeping with the wooden letter last name theme I bought these unfinished at Roberts Crafts. I searched thru every bin of every letter to find an "R" but they were all gone. I have gone back 3 times in the last 2 weeks and they are still out. Grrrrr......

I spray painted the blocks so they were a solid black.


I mod podged the letters onto a printed paper and cut them out. I sanded the edges down to soften and distress them a bit.


I then added some embellishments (buttons, ribbons, borders).


Still missing an "R". Every time my husband sees it he says "Mumfod...we should change our name." He is so hilarious I don't even know how I stand it. (sarcasm!)

Handy Tricks with Household things

Saw this on MSN and it give some of the BEST ideas! Thought I would pass them along. Here is the link and below are listed some of my favorites:

Repurpose an old frame for a vanity tray that's pretty as a picture. Place a piece of colored paper or fabric inside as a finishing touch.

A Twister game mat makes a spot-on tablecloth for a child's birthday party: Sticky spills and icing wash right off.

At a party, stash ice in a colander set on top of a bucket or a bowl. Water will drain out, and guests will get only the solid stuff.

Make no-mess pancakes with the help of a ketchup bottle: Pour in batter, then squeeze out precise portions.

Stop searching high and low for hair clips and elastics: Store them tidily on an empty TP tube.

Pick up interesting cardboard coasters at restaurants and bars you visit along your travels. Punch a hole near the edge, thread some ribbon through, and voilĂ : homemade gift tag.

Vegetable oil will put a shine on leather shoes. Use a damp cloth to remove any dirt, then run a soft cloth with a drop of oil over the surface to (literally) add polish.

One of readers' all-time-favorite ideas: the LifeSaver as birthday-candle holder. (Candies in the original rolls provide the best fit―LifeSavers sold in big bags are larger and don't work as well.)

Forget unruly plastic bags that seemingly regenerate under your sink. An empty tissue box keeps them neatly corralled and ready for use.

A giveaway shower cap becomes the perfect wrapper for shoes when traveling, preventing them from dirtying clothes packed in your suitcase.

A clever way to keep straight whose drink is whose: Mark each glass with removable window decals.

A binder clip serves as a key chain/money holder you can clamp to your waistband for a purse-free morning walk.

Pretty ribbon revives an old lamp shade. Apply a thin layer of glue and press on each piece of ribbon, matching the ends neatly.

No more oops! moments when painting, if you cover doorknobs and hardware with aluminum foil.

Who says a towel rack has to be the dedicated realm of, well, towels? Mounted over the kitchen sink, it can also hold a collection of cleansers.

Why pack with Styrofoam peanuts when you can pack with popcorn (plain and air-popped). No air popper? Be sure to cover the item with a plastic bag.

Slide bobby pins onto a hem to hold pleats in place as you iron them.

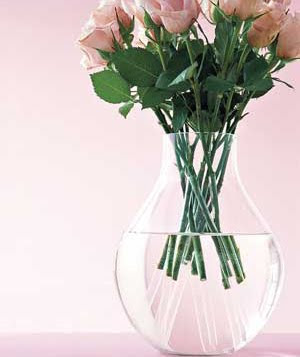
Bridge the gap between too-short stems and too-deep vase by sliding on trimmed clear plastic straws.

Attach a magnet to the inside of a metal medicine cabinet, and you can promptly pluck tweezers (or nail clippers) when needed.

Brown is my favorite color...

Put these together for my sisters house. I got the idea from a chica who did black block letters on craft paper and then framed them. It was really cute. I kind of wanted these to pop a little bit more. The colors for her living room are an olive green, eggplant purple accented with black and brown pillows.
I got these frames at the Dollar Tree...tacky gold plastic. Pretty hideous.


Not real cute, I promise. But for $1...


So I added my new favorite thing: BLACK SPRAY PAINT!
I covered the block letters in mod podge and stuck on the craft paper. I let it dry and then cut around the letter's edges with an ex-acto knife. I sanded them down a bit and left them distressed. Then I glued them to some craft paper that would make them pop out of the frame. I have some rub on letters that I added to the corners of the letter to add some detailing.

Finished B.


Here is the O.


I had to do the frames length-wise because the W was too wide to fit in it the other way.
Not too shabby. I am excited to show them to her and see how they look on the wall!

Plaque Re-do

Got this plaque as a wedding gift. It just wasn't doin' anything for me, not to mention the brownish-red-ish color I was not a fan of and didn't match A-N-Y-T-H-I-N-G!!


So I used my favorite new thing....black spray paint.


I found some circles to trace, since cutting a circle free-hand might as well be juggling with my feet.


Hmmm, me likey!

Picture Frame

I found this lovely frame at DI for $1. I loved the scallops and the details but the white paint was flecked and underneath it was gold paint...ICK! I wasn't sure how I was going to fix it, but I knew that if it was only $1 it was worth a try.


Some black spray paint...
I never cease to be amazed at how much better it makes things look!


This is probably my FAVORITE wedding picture of ours. We didn't have a frame for it before. All the other frames on the wall were black and the white just blended into the wall.

Hope Chest

I have this cute little white hope chest thingy that I bought at Target several years ago for $10 and put together myself. I have taken it with me when I have moved 7 times in the last 4 years . It has a few scuffs but for the most part it is still in pretty good condition. I had held everything from shoes to blankets, towels to purses. I LOVE IT! Anyway, this new re-doing furniture thing made me want to do something fun with it because I am kinda tired of just the plain white. I added the cushion to the top and it was so awful I couldn't sleep that night and had to get up and finish it.


I cleaned the surfaces and measured them. Then I used my paper cutter to trim the desired paper down to size and mod podge it on. Our bedroom color scheme is chocolate brown, white and pale blue, hence the color choice.

Front panels done. Now to remove the cover and do the top...

I had never removed staple-gun staples so I was in for a bit of a surprise. I had to man handle them a bit with a flat head screwdriver and some pliers but I got the job done.


Ahhh, MUCH better! The paper might be a bit much I guess, but it's better than it was! Now we just need a bedroom big enough to hold more than our king sized bed:)